Sunday, November 22, 2020

Accelerated Dragon #8

 Ideas in the Accelerated Dragon

Idea #8 -  Maroczy Bind


White has a major option for preventing Black's plans in the Accelerated Dragon.  By playing 5.c4, White can stop Black from playing ...d5.  This is called the Maroczy Bind.

1.e4       c5
2.Nf3    Nc6
3.d4      cxd4
4.Nxd4 g6
5.c4


By playing 5.c4,  White has:
  • Prevented Black from playing ...d5 any time soon
  • Staked out a space advantage
  • Changed the nature of the game to emphasize positional maneuvering
  • Limited the scope of his light squared bishop
  • Note:  Black's bishop on g7 will still be a monster
White's plans will revolve around:
  • Maintaining the space advantage (which means avoid trading too many pieces)
  • Planting a knight on d5 (the Marco Hop), or b5
  • Expanding on the queenside with b4 and c5
  • or Expanding on the kinside with f4 and e5
  • Exchanging dark square bishops
Black's plans are based on:
  • Trading off at least one pair of knights (the knight on d4 is the first target)
  • Making this trade so that White recaptures with the queen, not the bishop
  • Weakening the long diagonal for the g7 bishop by playing ...Be6 prompting White to play b3
  • Or weakening the long diagonal with ...a5 and ...a4
  • After a Marco Hop, trading off White's knight on d4 with the bishop, leading to a good night vs bad bishop endgame.  (Be prepared to defend the backward pawn on e7 after exd5.)
  • Pawn breaks:  ...b4 or ...f4
  • Good squares for pieces:
    • Knight: c5 or e5
    • Bishop: c6 or e6
    • Rooks:  b8 and c8
    • Queen:  a5
The move order to accomplish all of this is the Gurgenidze Variation.
This involves a specific move order:
  • 5...Nf6 (prompting 6.Nc3) and 6...e6 come first.  This creates the threat of 7...Ng4
  • White would like to put a bishop on e3, but usually plays 7. Be2 because of blacks threat
  • Now is the time to trade:  7...Nxd4, since White will have to re-capture with queen.
  • finally 8...Bg7 and 9...O-O.

Here is a game showing many of these ideas:


Saturday, July 25, 2020

Accelerated Dragon #7

Ideas in the Accelerated Dragon

Idea #7 -  When White plays Nxc6


As a general rule, Black is happy when White plays Nxc6.  For these reasons:

  • After Black recaptures with a pawn.  White can no longer play Nd5, which is usually strong for White.
  • If Black recaptures with the b-pawn, then the d-pawn advance will be supported by the new pawn on c6.
  • If Black recaptures with the b-pawn, the open b-file and dark square bishop makes the square b2 a target.  Especially if White castles queenside.
  • If Black recaptures with the d-pawn, the open d-file can lead to simplifications or tactics favorable for Black.
So in most of the lines of the Accelerated Dragon, White only plays Nxc6 to get out of tactical trouble. 

How do you decide whether to re-capture with the b or d-pawn.  The answer:  re-capture with the b-pawn unless White would be able to play an immediate Bd4 threatening to exchange dark square bishops (like after Black plays ...Ng4)  and the d-pawn re-capture would prevent that move.

There is one advantage of this move for white, however.  Eliminating Black's knight on c6 enables the move e5.  With this in mind, there is one line where strong players have tried Nxc6.  The proper timing is on move 7 right after Black plays Nf6, so that e5 comes with an attack on the knight.


Saturday, July 18, 2020

Accelerated Dragon #6

Ideas in the Accelerated Dragon

Idea #6  -  White's main line with 7.Bc4 and 8.Bb3

As we saw in Idea #5, this line is probably White's last chance to try for a Yugoslav Attack.
The moves up to this point:

1. e4        c5
2. Nf3     Nc6
3. d4       cxd4
4. Nxd4  g6
5. Nc3    Bg7
6. Be3    Nf6
7. Bc4    0-0
8. Bb3    


Idea 4 in that post recommended the move 8...a5.  This was based on the pattern of white having a minor piece on b3 (so ...a4 would be a threat).  This move also gives the rook a potential entry via a6.

If White ignores the threat and plays something like 9.0-0, then the e-pawn will fall after 9...a4.

White can try to stop ...a4 by playing 9.a4 first.  This means that if the Bishop on b3 is ever traded, White will have to recapture with the c-pawn.  So Black can play 9...Ng4, knowing that after 10.Qxg4 the move 10...Nxd4 will threaten discovered check against the white queen, and one of White's bishop will be traded for the knight.

So at move 9,  White's main line is 9.f3

Now black finally gets to play 9...d5in one move which has always been the objective.


Here, White's hopes for a Yugoslav Attack are crushed.  It would be too risky to try to castle queen side and advance king side pawns when Black can open the center and the a-pawn advancing is a nasty threat.

If White captures with the e-pawn,  Black will play ...Nb4 and will eventually get the pawn back.

Note:  It would be a mistake for White to take first on d5 with knight and then with Bishop.  Black would then take twice on d4, leaving the white queen on d4.  Now the white bishop is pinned.


Here is an interesting game that shows a lot of Black's ideas.


Sunday, July 12, 2020

Accelerated Dragon #5

Ideas in the Accelerated Dragon

Idea #5 -  When white tries to prevent 8...d5 with 7.Bc4  --  Patterns to know

Let's take a look at the main line sequence:

1. e4        c5
2. Nf3     Nc6
3. d4       cxd4
4. Nxd4  g6
5. Nc3    Bg7
6. Be3    Nf6
7. Bc4    0-0


With 7.Bc4, White is signalling the intention to play a Yugoslav Attack while trying to prevent Black from playing 8...d5.  As usual, Black plays 7...0-0.   Now White proceed with caution, as it is easy to make a mistake.

Since Black will not be able to play 8...d5, I will show you 4 patterns to guide your response, depending on what White plays.

Pattern 1 -   White plays 8.f3 leaving the bishop on e3 undefended.

This position is common in amateur play.  White is continuing to try for the Yugloslav attack.
But 8.f3 is inaccurate for White, leaving the bishop on e3 unprotected.

Black can exploit this by playing 8...Qb6, attacking the unprotected pawn on b2, and an x-ray attack on the e3 bishop.

White's best choice is probably 9.Bb3, but this lets Black unleash the monster bishop with 9...Ng4 or 9..Nxe4 initiating tactics that favor Black.  (Note:  White can set a trap with 9.a3 hoping to trap the Black queen, but Black can avoid the poison pawn and play 9...Qc5.)


Pattern 2  -  White plays 8.Qd2 leaving the square g4 undefended.

This move is also common in amateur play.  White is again trying for a Yugoslav Attack, but unfortunately the move 8.Qd2 leaves the g4 square undefended.

Black takes advantage of this by playing 8...Ng4 with a discovered attack on the knight.

White cannot move the bishop without losing the knight, so will either have to give up his bishop for a knight, or play 9.Nxc6 with simplifications that favor Black.


Pattern 3 -   White plays 8.0-0 allowing the "fork trick"

Sometimes White gives up on a Yugoslav Attack and plays 8.0-0.

This allows the "fork trick" (a similar situation occurs in the Two Knights Defense) with 8...Nxe4.

If White recaptures with 9.Nxe4,  then 9...d5 forks bishop and knight.  
White can try 9.Bxf7+ leaving Black a rook on the semi-open f-file and two central pawns.


Pattern 4 -  White plays 8.Bb3 tempting the a-pawn to advance.

If White doesn't what to play into one of the 3 patterns above, the best move left is 8.Bb3, which avoids the fork trick, and might still lead to a Yugoslav Attack if Black complies.  This should probably be considered the main line.

The pattern for Black to notice here is a minor piece on b3.  When you see this, you should automatically consider 8...a5, threatening 9...a4.  

White has several replies, which will be covered in the next post.


Thursday, May 21, 2020

Accelerated Dragon #4

Ideas in the Accelerated Dragon

Idea #4  -  If White doesn't prevent it, play 8...d5


As we saw in the post,  Accelerated Dragon #1, Black wants to play the d-pawn to d5 in one move.  When Black is able to do this, he generally equalizes.  And this move throws a wet blanket on White's plans for a Yugoslav Attack, or Classical Dragon.

As we saw in the post, Accelerated Dragon #2,  Black's first 7 moves are usually the same.  So move 8 is the right time to play ...d5.

Here is in interesting game where Black gets his way.


The next few posts will look at ways White tries to stop Black from playing ...d5.


Monday, May 11, 2020

Accelerated Dragon #3

Ideas in the Accelerated Dragon

Idea #3 -  Black's dark square bishop is a monster.


The moves 1...c5 and 2...Nc6 have softened up the central dark squares. Blacks bishop on g7 threatens to run amok on the a1 to h8 diagonal. White must always be on the lookout for discovered attacks when Black moves the f6 knight.

White would like to trade off Black's dangerous bishop. Plans with Qd2 and Bh6 are common, as is Nxc5 and Bd4. Unfortunately for White, these plans are usually 1 move too slow.

Black wants to avoid trading off his valuable bishop, unless he gets something substantial for it. This would be something like:
  • Win of material.
  • Double White's pawns on the half open c-file, especially if it exposes White's king after castling queenside
  • Transition into a better endgame.

Black would especially like to trade one of his knights for White's dark square bishop. Then the monster on g8 will rule the dark squares unopposed.

Here is an example showing all these ideas.  Note: this does not represent best play by White, but all the moves seem plausible and often happen in amateur play.


Saturday, April 25, 2020

Accelerated Dragon #2

Ideas in the Accelerated Dragon


Idea #2:  Black plays the same first 6  moves whenever possible, and usually castles on the 7th.


These moves are:  

1.e4        c5
2.Nf3     Nc6
3.d4       cxd4
4.Nxd4  g6
5.Nc3    Bg7
6.Be3    Nf6   

7.Bc4    0-0     
   or 7.f3      0-0  
   or 7.Qd2  0-0  
   or 7.Be2   0-0  
   or 7.Nb3   0-0  


Of course this only works if White cooperates.  We will look at deviations by white in later posts.


Saturday, April 18, 2020

Accelerated Dragon #1


Ideas in the Accelerated Dragon

Idea #1 - Black wants to play ...d5 in one move

In the Sicilian Defense, ...d5 is generally an important freeing move for Black. With ...d5 and the resulting open lines in the center, White's plans of king side attack (with f3, g4, h4, h5 as in the Yugoslav Attack, or 0-0, f4, f5 as in the Classical Dragon) invite more risk for the first player.

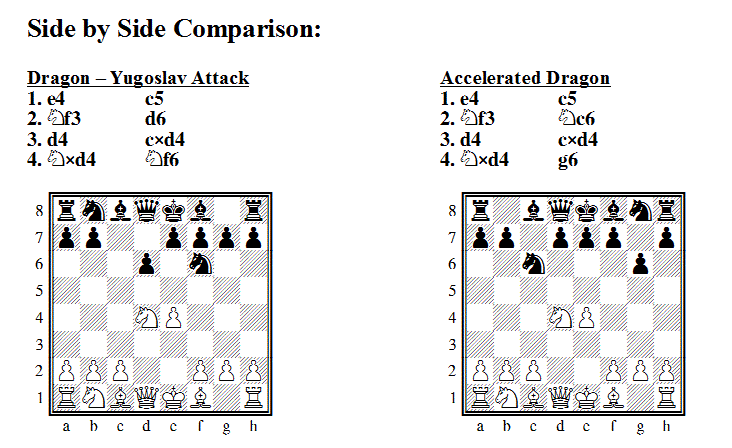
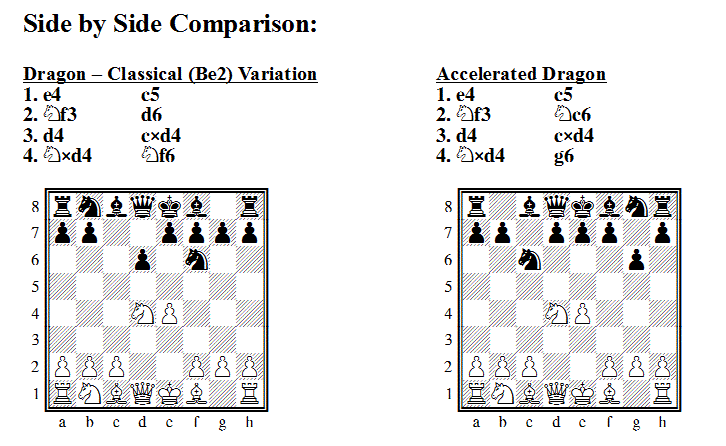
In the standard Dragon move order, black plays an early ...d6, which means that ...d5 costs another tempo later. To illustrate the impact of this difference, we will compare two common Dragon strategies (the Yugoslav Attack, and the Classical Dragon) with the Accelerated Dragon.


Note: Of course, White does not have to allow Black to play the Accelerated Dragon. In particular, the Maroczy Bind and the Rossolimo Variation would derail Black's plans. But that is for another chapter.


Monday, January 16, 2017

How Do You Capture ?

How do you capture?

What I am wondering is:  when you perform a capture using real pieces on a real board, how would you describe the series of motions?


An Example

In this position,  White is about to make the capture 8.Qxg7


2 Patterns

Watching people play chess, I have observed 2 distinct patterns in how this is executed:

Pattern 1:

  1. White picks up the pawn on g7.
  2. Picks up the queen on g4 (holding both the queen and pawn in the same hand).
  3. Places the queen on g7.
  4. Hits the clock (pawn still in hand)
  5. Places the pawn on the table.

Pattern 2:

  1. White picks up the queen on g4.
  2. Picks up the pawn while placing the queen on g7.
  3. Hits the clock (pawn still in hand)
  4. Places the pawn on the table.

Why would anyone use pattern 1 ?

In my career as a manufacturing process engineer, I have been trained to identify and eliminate wasted motion.  Clearly, pattern 1 takes one more arm movement than pattern 2.  If there were a work instruction for capturing a piece, I would require the use of pattern 2 so as not to wast time.

Strangely, my observation is that stronger players (masters and up) tend to use pattern 1 more than than lower rated players.  My best guess is that these players learned to play chess before they were old enough to hold both pieces in their hand at the same time, so they actually picked up the pawn (step 1) then placed it on the table (step 5) before moving the queen (steps 3 and 4).

Why you should use pattern 2

  • Fewer arm motion steps (this could be critical in time trouble).
  • The arm does not have to change direction as sharply in most cases (again time savings)
  • The order of the steps matches the notation:
    • 8.Qxg7 (the queen on g4 takes the pawn on g7)
    • Not  the pawn on g7 is captured by the queen on g4
  • Touch move rule:
    • If you touch the pawn first, you are obliged to capture it (with only one option)
    • If you touch the queen first, you are obliged to move it (with 14 legal options)
    • The less committal option could allow you more options to salvage a mistake.
  • Less likely to misplace the piece (I have seen the queen put back on the wrong square)
  • It just looks cooler

Your thoughts?

If you use pattern 1, please leave a comment explaining why.

Sunday, December 6, 2015

Clock Progress - Wood Cut for Case


The wood is all cut out for the clock case.  For this first attempt, I used some cheap 1/2 pine craft board from Lowes so I could make all of my mistakes at a low cost.   If this turns out, I may re-build it with some nicer wood.


Next is sanding, gluing and staining.  Then the lever mechanism and the electronics will be stuffed inside and I will have a real chess clock.

Saturday, November 14, 2015

Clock Progress - Lever mechanism for mechanical buttons

I have started working on my clock again.  Here is a picture of the lever mechanism for the mechanical buttons.   Magnets below each arm give the feel that the buttons are snapping into place.


Friday, September 4, 2015

Reasoning vs. Intuition

Two Types of Thinking

I divide the types of thinking that a chess player uses during a game into two categories:  Reasoning and Intuition.

Perhaps we should start with some definitions.


Reasoning

By reasoning, I mean the concrete calculation that goes on when a chess player is analyzing variations.  Reasoning is when a player is considering moves and consequences.  Reasoning is hard work.

Intuition

Intuition is the mode of thinking that relies on experience, gut feel, instinct, rules of thumb.  Intuition is not exact calculation; instead it is a feeling about a move or position.


How Computers "Think" while playing chess.

To explore the ideas of reasoning is and intuition, I first need to take a look at how computers are programmed to find moves.    This is an overly simplified explanation, but it covers the important points.

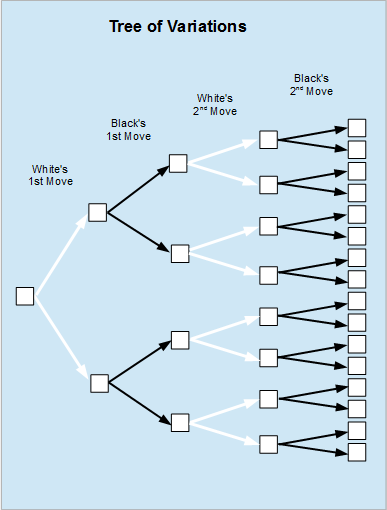
The computer first generates a tree of variations.  For my example, the computer will only look 2 moves deep for each player, and will only look at 2 moves at each branch.  In reality, the programs will look at more moves and will look deeper in positions that have forcing continuations.


Next the program will calculate a value that represents an evaluation of the position for each of the final positions.  This score will be based largely on the material balance, but also positional considerations.  For my example I just generated random values between -9 and 9.  A negative score is in Black's favor, and a positive score means White is better.


What follows next is called the Minimax algorithm.  Working from the final position backwards,  the program first calculates the score for the position after White's second move by choosing the minimum score of the two choices of moves for Black.  Then the program calculates the score for the position after Black's 1st move by picking the maximum score of the two choices of moves for White.  This happens two more times until all of the positions have a score.


By applying the Minimax algorithm, the program calculates that the best move White can make is the one marked 'a' above, which has a score of -3.  The alternative has a score of -6 which is even better for Black.   Black's best response to move 'a' is move 'b'.  White's best 2nd move is 'c', and Black's best second move is 'd'.


Now back to Human Thinking

I showed you all that in order to discuss how reasoning and intuition are used when humans play chess.

While generating the "tree of variations" in their heads, humans cannot possibly consider every move at every branch.  Only a limited number of moves can be considered, and to decide which, we use intuition.  Rules of thumb help, which guide use to look at checks, captures and treats.  Experience can play a role if the position is similar to other positions we have seen before.  And gut feel can guide us into considering certain moves.  Intuition also guides us in how deep we follow each line.  Much like with the computer program, we use the rule of thumb to look deeper into lines with forcing moves.

Evaluating the positions at the end of each branch also involves intuition.   We humans don't have the processing power to do a computer-like evaluation, but we can estimate how much we value differences in material, pawn structure, piece activity, weaknesses, etc.  Rules of thumb are useful for the material imbalances.  Instinct may tell us that piece activity may compensate for a weak pawn.

The human equivalent of the Minimax algorithm is where we use reasoning.  Visualizing the possible moves at each branch and assigning mental scores is where we can use pure calculation power.  As I mentioned above,  reasoning is hard work.  It takes mental discipline to do a thorough evaluation of the important moves and the opponent's replies.


The role of Time 

Reasoning also takes a lot of time.  You may notice that at long time controls, you will use reasoning much more than you do at 5 minute chess where it is mostly intuition.  Something else to consider is that your reasoning will often benefit by spending more time,  but your intuition will not.


Improving your Reasoning and Intuition

Reasoning is a skill, and is improved by practice.  Solving tactical positions and working through endgame studies are good ways to improve your reasoning.

Intuition is based in part on your knowledge and experience,  so reading books on strategy and playing over master games are good ways to improve intuition.


Saturday, May 23, 2015

Openings for Beginners


What opening should I play?

I see this question a lot on internet forums.  There are so many openings, with multiple paths and transpositions, it is no wonder beginners are confused.

General Advice

The advice most often given to beginners is to play the open games.  These are the openings that start with White playing 1.e4 and Black responding with 1...e5.  These openings are called the open games because there are usually pawns traded on the center squares resulting in open central files and diagonals.  With all these open lines, the pieces come into play quickly and it is often easy to figure out the best squares for your pieces.  Quick development, king safety, and the fight for the central squares are usually the main priorities of the open games.

All of the above tends to make the open games good for learning, but I think the best reason to play the open games is that when you lose, it will usually be easy to figure out your mistake because it will be punished tactically right away.  In the closed games, your positional mistake may not be exploited for another 10 moves, and the beginner will not be able to make the logical connection.

Who is the target audience of this advice?

The title says openings for beginners, and certainly anybody just learning to play chess should consider the opening advice listed below.  I would think players rated under 1200 should also be trying out these openings.  All the lines I give have been played by masters, so there is no need to worry that these lines are unsound.  If they suit your style you could play them as you progress up through ratings of 1600 to 1800.

I should also note that these recommendations are intended to maximize learning, not increase short term performance.  You may lose a higher percentage of games at first if you adopt these openings, but I am confident that your understanding will improve, and in the long term, so will your results.

Now for some specifics

To cut to the chase, I am recommending the Scotch Game, but using a modified move order.

The Scotch Game is usually reached by:

1. e4  e5
2. Nf3  Nc6
3. d4

when Black almost always plays  3...exd4


The move order I recommend is:

1. e4  e5
2. d4  dxe4
3. Nf3

and if Black responds with 3...Nc6, then we will have reached the same position.


Why this move order?

There are a couple of reasons why I recommend this particular move order.

  • Some of Black's best options are avoided with this move order (see notes below)
  • There are more opportunities for Black to make a mistake
Of course nothing comes for free, and Black will have a few options against this move order that are not available otherwise, but these are of little consequence.


What if Black doesn't play those moves?

That is a very good question.  I first want to show some lines in the Scotch Game, then I will give some advice on how to play if Black plays moves other than those that lead to the Scotch Game.

The Scotch Game

We will consider two main variations in the Scotch Game following these moves:

1. e4  e5
2. d4  exd4
3. Nf3  Nc6
4. Nxd4

Black will usually play either 4...Bc5 or 4...Nf6.   You will also need to prepare for 4...Qh4.   Beginners will sometimes play 4...Nxd4, but this should cause you no trouble.


Gambit options for White

White can choose not to re-capture the pawn on move 4.  There are some options where White can sacrifice a pawn to gain a lead in development with lots of open lines that may lead to an early attack.
4.Bc4 is the Scotch Gambit
4.c3 is the Goring Gambit.


When Black does not play 3...Nc6

These are some moves that Black may play instead of 3...Nc6
3...Nf6 is a variation of the Petroff Defense
3...d6 is a line in the Philidor Defense
3...Bb4+ and 3...Bc5 are options that are unique to this move order, but not problems for White.
3...c5 is sometimes played by beginners and is just bad for Black.


What if Black does not play 1...e5?

That will have to be another chapter.  In most cases, the idea of playing 2.d4 will be the right move, and against the Sicilian, you can follow up with 3.Nf3.


Summary

As White, I recommend beginning players aim for the Scotch Game (or possibly the Scotch Gambit) using the 2.d4 move order.   This will lead to positions that beginning players will be able to understand and learn from.  This last diagram is a summary of the lines discussed above.


Saturday, April 25, 2015

Thursday, April 23, 2015

Working Prototype

Here is my working Prototype

It is hard to get a good picture of the displays.


The clock on the left is counting down.  The button on the left is lit indicating which player is on the move.  I will try to post a video soon.


Making all of the wiring cables, and soldering everything to the perf board took a lot more time than I had expected.


Saturday, April 4, 2015

Plastic Prototype Enclosure


It is time to move off the breadboards and into the prototype in a box phase.   I bought a plastic storage box for about $4.  It is made from polypropylene which is easy to cut.  I drilled 1 inch holes in the bottom for the two lighted switches, and cut a large rectangle in the side for the displays.


This box is much larger than the final wood version will be.  The wood version will be shaped much more like a Chronos; a bit wider, lower and narrower, with a sloped front for the displays.  I also plan to use mechanical plungers instead of the buttons, but this will work for the prototype.  These buttons have an LED inside that I will use to indicate who is to move.  The sides of this box are transparent, so I won't have to open the box to show off the electronics inside.

Next step is to make wiring harnesses for the displays.  The headers on the displays have male pins spaced 0.1 inches.  This page has instructions for building the wiring harness.  Since the displays only use 12 of the 16 pins, and they are in groups of 6, I will likely use two 6 pin housings for each display.  I can get all the parts at the local electronics shop.

More pictures to follow.


Friday, March 27, 2015

It's a Clock !


I've got the basic clock sending time output to the displays.  The LEDs show who is on move, and the buttons switch the clocks and LEDs.


What is left to do (software):
- move counter
- increment and delay
- multiple periods
- Setup routine for setting time and choosing options using buttons
- save settings to non-volatile memory

What is left to do (hardware)
- switches (on/off and pause)
- 4 buttons for navigating the menus
- prototype case, probably plastic
- eventually a nice wooden case, with mechanical plungers.


Sketch Update

I modified the printTime() function to convert the time remaining for each player from 1/10 seconds to H:MM:SS and to write that to the displays, by calling a new writeNum() function.


// Function to write the time to the displays
void printTime() {                      // print time function
  int secDis1;
  int secDis10;
  int minDis1;
  int minDis10;
  int hrDis1;
  int secs;
  
  secs = timeR1 / 10;                  // convert 1/10 sec to H:MM:SS
  hrDis1 = secs / 3600;
  secs = secs % 3600;
  minDis10 = secs / 600;
  secs = secs % 600;
  minDis1 = secs / 60;
  secs = secs % 60;
  secDis10 = secs / 10;
  secDis1 = secs % 10;
  
  writeNum(hrDis1,3,1);
  writeNum(minDis10,7,1);
  writeNum(minDis1,10,1);
  writeNum(secDis10,14,1);
  writeNum(secDis1,17,1);
  
  secs = timeR2 / 10;                  // convert 1/10 sec to H:MM:SS
  hrDis1 = secs / 3600;
  secs = secs % 3600;
  minDis10 = secs / 600;
  secs = secs % 600;
  minDis1 = secs / 60;
  secs = secs % 60;
  secDis10 = secs / 10;
  secDis1 = secs % 10;
  
  writeNum(hrDis1,3,2);
  writeNum(minDis10,7,2);
  writeNum(minDis1,10,2);
  writeNum(secDis10,14,2);
  writeNum(secDis1,17,2); 
}


Part of the writeNum() function:


// function to write digits to the displays
void writeNum(int charDigit, int charPos, int turn){
   switch (charDigit){
      case 0:
         if (turn==1){
           lcd1.setCursor(charPos,0);
           lcd1.write(1);
           lcd1.write(2);
           lcd1.write(2);
           lcd1.setCursor(charPos,1);
           lcd1.write(3);
           lcd1.write(32);
           lcd1.write(3);
           lcd1.setCursor(charPos,2);
           lcd1.write(3);
           lcd1.write(32);
           lcd1.write(3);
           lcd1.setCursor(charPos,3);
           lcd1.write(3);
           lcd1.write(2);
           lcd1.write(4);
         }
         else{
           lcd2.setCursor(charPos,0);
           lcd2.write(1);
           lcd2.write(2);
           lcd2.write(2);
           lcd2.setCursor(charPos,1);
           lcd2.write(3);
           lcd2.write(32);
           lcd2.write(3);
           lcd2.setCursor(charPos,2);
           lcd2.write(3);
           lcd2.write(32);
           lcd2.write(3);
           lcd2.setCursor(charPos,3);
           lcd2.write(3);
           lcd2.write(2);
           lcd2.write(4); 
         }
         break;

and this continues for each of the 10 digits, plus a blank space if I want to use that later.

Thursday, March 26, 2015

Functioning Clock and BIG NUMBERS

Working Chess Clock

I now have a functioning chess clock.  Lots of work yet to be done, but the basic functions are all working.

I took the code from the earlier clock test, and changed it from sending the output to the serial port, to writing the time to the displays.  I also made the updates every 1/10 second.

This picture shows the two buttons and the green LEDs which indicate whose turn it is to move:


The buttons are wired to pins 2 and 3, with 10 K ohm pull-up resistors to +5V.  Closing the switch pulls the pin to ground.

The LED anodes are connected to pins 4 and 5, with 560 ohm resistors between the cathode and ground.  (similar to the schematics published earlier, but the pins have changed).

This next picture shows the display for player 2.  Note, it is counting down tenths of seconds.


I will attach the sketch at the bottom of this post.


Big Numbers

I also did some work on making large numbers for the time display.  (I don't know why this blog page insists on turning the image sideways, it is horizontal on my PC, but you can still see the large digits).


These large numbers were made by combining 7 custom characters.  The custom characters are numbered 0 through 7, but I used 1 through 7 because those were the numbers I used when I drew out the patterns on graph paper.  Note, if you use character 0, the data type must be declared something like this:  lcd.write((byte)0);   It has something to do with control codes vs. custom characters.  Luckily, since I used 1-7, I didn't run into this issue, but read about it on other web pages.

Some pieces of the sketch that created these large numbers:

#include <LiquidCrystal.h>
LiquidCrystal lcd1(6,7,9,10,11,12);
LiquidCrystal lcd2(6,8,9,10,11,12);

// create bit maps of the custom characters.  5 columns by 8 rows.
byte customChar1[8] = {
  B00000,
  B00000,
  B00000,
  B00000,
  B00011,
  B00011,
  B00011,
  B00011
};
.
.
.

void setup() {
   lcd1.begin(20, 4);
   lcd2.begin(20, 4);
   lcd1.createChar(1,customChar1);   //  assign the bitmap pattern to character 1
   .
   .
   .
}

void loop() {
   lcd1.setCursor(3,0);
   lcd1.write(1);     // write character 1
   .
   .
   .
}


And now, my most up to date clock sketch (from the photos at the top of this post):


//   
//  Chess Clock Practice Sketches
//
//  Bob Nolan
//  3/26/2015
//

// Include LCD display library and set up pinouts
#include <LiquidCrystal.h>
LiquidCrystal lcd1(6,7,9,10,11,12);
LiquidCrystal lcd2(6,8,9,10,11,12);

// Declare Global Variables
unsigned int timeR1;
unsigned int timeR2;
unsigned long lastMilliS;
int turn;
int ledPin1 = 4;
int ledPin2 = 5;
int switchPin1 = 2;
int switchPin2 = 3;
boolean checkButton;
boolean flag1=0;
boolean flag2=0;

void setup() {
  timeR1 = 150;                // set initial time.  Time is in 1/10 sec
  timeR2 = 150;                // need to add user input routine
  turn=0;
  pinMode(ledPin1,OUTPUT);
  pinMode(ledPin2,OUTPUT);
  pinMode(switchPin1,INPUT);
  pinMode(switchPin2,INPUT);
  lcd1.begin(20,4);
  lcd2.begin(20,4);
  lcd1.print("Player 1");
  lcd2.print("Player 2");
}

void loop() {  
 if (turn==0){              // dont start counting until 1st button press
    lastMilliS=millis();
 }
  if (millis()-lastMilliS >= 100) {   // every 100 msec, update time
    lastMilliS=millis();
    if((turn==1)&&(!flag1)){
      timeR1--;
    }
    if((turn==2)&&(!flag2)){
      timeR2--;
    }
    printTime();
  }
  checkButton=digitalRead(switchPin1);   // player 1 button press
  if(!checkButton && (turn!=2)){
    digitalWrite(ledPin2,HIGH);
    digitalWrite(ledPin1,LOW);
    turn = 2;
    printTime();
    
  }
  checkButton=digitalRead(switchPin2);   // player 2 button press
  if(!checkButton && (turn!=1)){
    digitalWrite(ledPin1,HIGH);
    digitalWrite(ledPin2,LOW);
    turn = 1;
    printTime();
   
  }
  if((timeR1<=0)&&(!flag1)){            // player 1 flag
    lcd1.setCursor(0,2);
    lcd1.print("Flag");
    flag1=1;
  }
  if((timeR2==0)&&(!flag2)){            // player 2 flag
    lcd2.setCursor(0,2);
    lcd2.print("Flag");
    flag2=1;    
  }
}

void printTime() {                      // print time function
   lcd1.setCursor(0,1);
   lcd1.print(timeR1);
   lcd1.print("  ");
   lcd2.setCursor(0,1);
   lcd2.print(timeR2);
   lcd2.print("  ");
}

Wednesday, March 25, 2015

More progress with the displays


I have both displays hooked up and working independently now, and like I had hoped, it only takes 7 output pins to drive both displays.

Here is how they are wired

LCD Pin Arduino Pin
1 Logic Gnd Gnd
2 Logic +5V +5V
3 Contrast Pot sweep
4 RS Pin 6
5 RW Gnd
6 EN (LCD1) Pin 7
6 EN (LCD 2) Pin 8
7
8
9
10
11 DB4 Pin 9
12 DB5 Pin 10
13 DB6 Pin 11
14 DB7 Pin 12
15 Backlight +5V +5V
16 Backlight Gnd Gnd

I used one potentiometer to control the contrast on both displays.  All of the connections go to both displays except the enable which has pin 7 going to display 1 and pin 8 going to display 2.

Sample Sketch

I used the following sketch to test that I had both displays wired correctly.  Notice that I had to define the pinouts for LCD1 and LCD2.


#include <LiquidCrystal.h>

LiquidCrystal lcd1(6,7,9,10,11,12);
LiquidCrystal lcd2(6,8,9,10,11,12);

void setup() {
  // put your setup code here, to run once:
lcd1.begin(20, 4);
lcd2.begin(20, 4);

 lcd1.print("Player 1");
 lcd2.print("Player 2");

}

void loop() {
  // put your main code here, to run repeatedly:
 lcd1.setCursor(0,1);
 lcd1.print(millis()/1000);
 delay(1000);
 lcd2.setCursor(0,1);
 lcd2.print(millis()/1000);
 delay(1000);
}

Tuesday, March 24, 2015

Phase 3 - Integrate the displays

Phase 3 has begun!


The displays arrived today.  First I soldered on the headers.  It has probably been 25 years since I did any precise soldering so it doesn't look like a professional job, but it works.  I tested each connection with my ohm meter to make sure I had a good contact and wasn't shorted to the next pin over.

Next I followed the tutorial from the Adafruit website to wire up the displays.  Then loaded the "Hello World" example.  I swapped the displays to make sure both were working correctly.  That was quicker than running another set of jumpers.

Next steps:
- update my clock sketch to send the time to the displays
- figure out how to do my custom characters for the large digits
- polish up the sketch and add delay, increment, and multiple periods
- create a setup routine so the time and other settings can be set with button presses

I'll post more updates as I make progress.